
The Japanese PlayStation Store is a treasure chest for those willing to put in the little effort required to unlock it by creating a Japanese PSN account. Not only you can buy all sorts of great games that aren't getting a western release or will take months or even years to come this side of the ocean, but it's full of demos and themes that you can grab and enjoy for free.
For instance, Sega just released the awesome Yakuza 6 demo, and on December 22nd it will launch the full prologue of Valkyria: Azure Revolution as a free trial for the game, while free themes are released quite often. With a Japanese PSN account, you can get them with little effort, and enjoy them without spending a dime.
Of course, creating a PSN account is an obstacle for many, even if it's a lot easier now than it was a few years ago, when there was no way to create an account on the web and you actually had to use a cumbersome interface on your PS3.
If the Japanese language intimidates you (or if kanji are the equivalent of moon runes for you), we're here to help. Below you can find a full fledged guide that will teach you to create a Japanese PSN account, activate it, install it on your PS4, as well as a few basics to manage it, like redeeming Japanese PlayStation Store codes, changing your password, and more.
The size of the article might make it look unwieldy, but that's just because we opted not to leave anything to the imagination, and cover every single step. This whole process can very easily be completed in half an hour or your time. Trust me, if you're even remotely interested in Japanese games, it'll be worth it.
As a genuflection towards disclaimers, DualShockers does not take any responsibility for what you'll do with the guide included in your article, for the fact that you'll have to pretend to live in Japan, and for any damage you deal to your equipment, fingers or anything else.
Now that the disclaimer is out of the way, let's get down to business.
If you use the web-based PlayStation Store log out from it, and then close the window. In a new window (or if you don't want to log out, you can use an incognito window) access the Japanese PlayStation Store by going to this link, and selecting the option in the image (Japanese). Click "Ok."

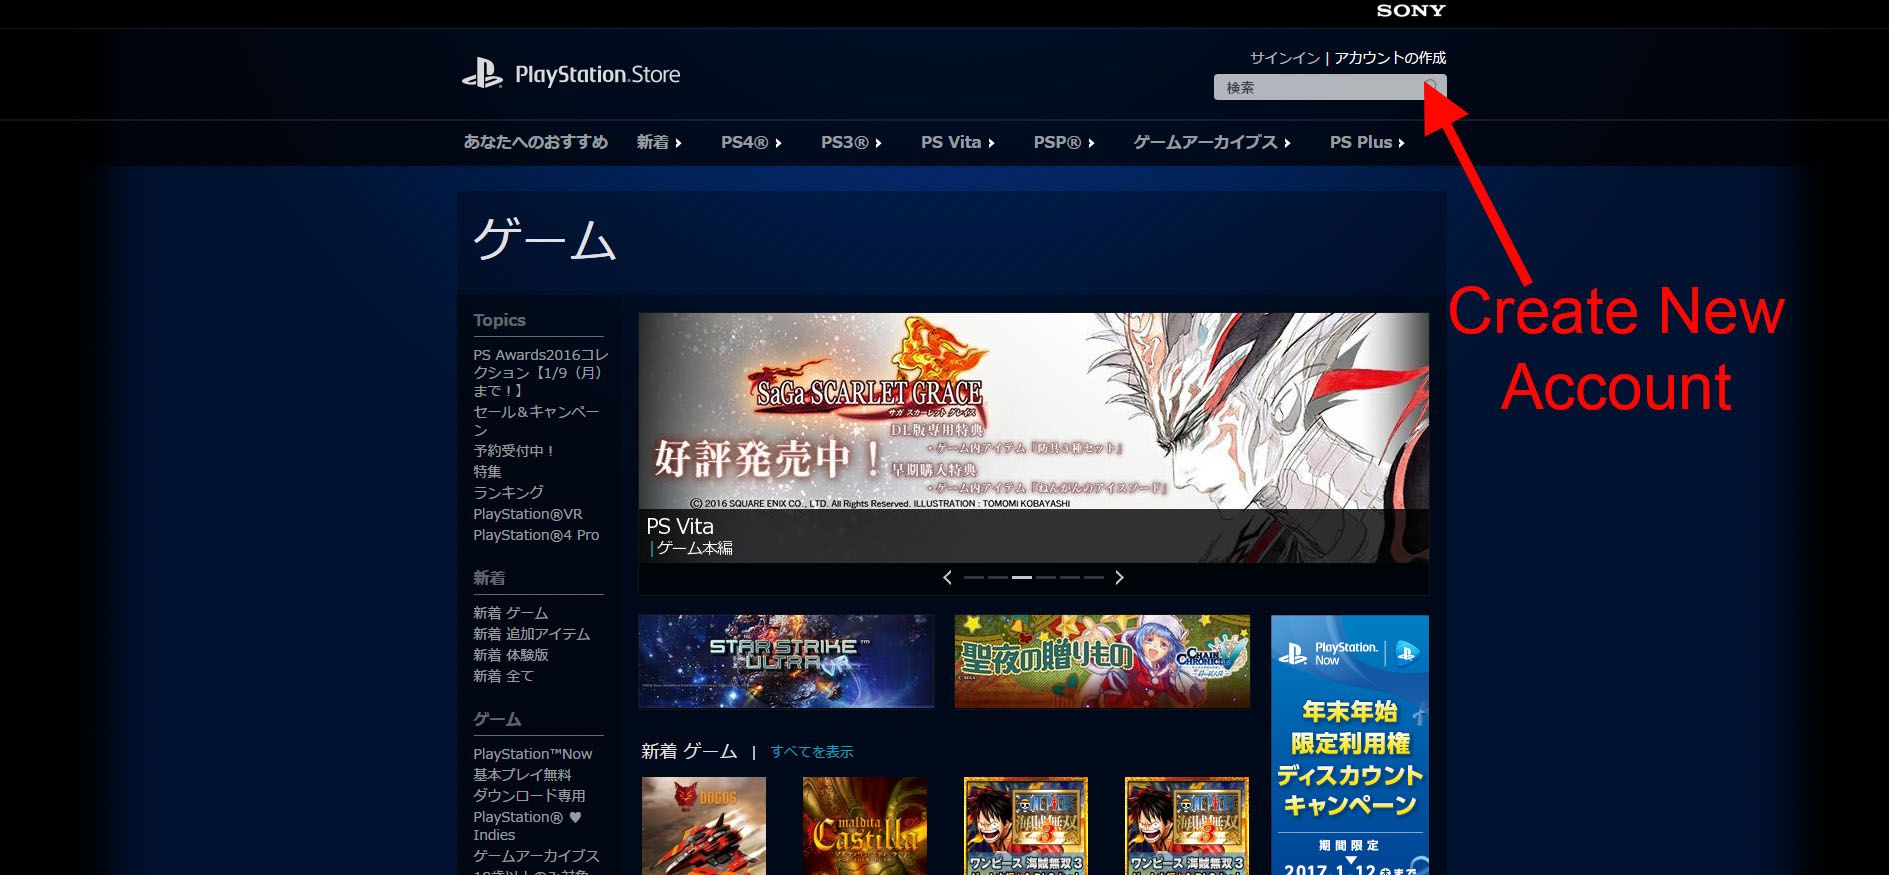
The Japanese PlayStation Store is now available. If you use Google Chrome the translation feature should let you navigate it with ease, but first things first: you need an account.
Click on the "アカウントの作成" option to create a new account.

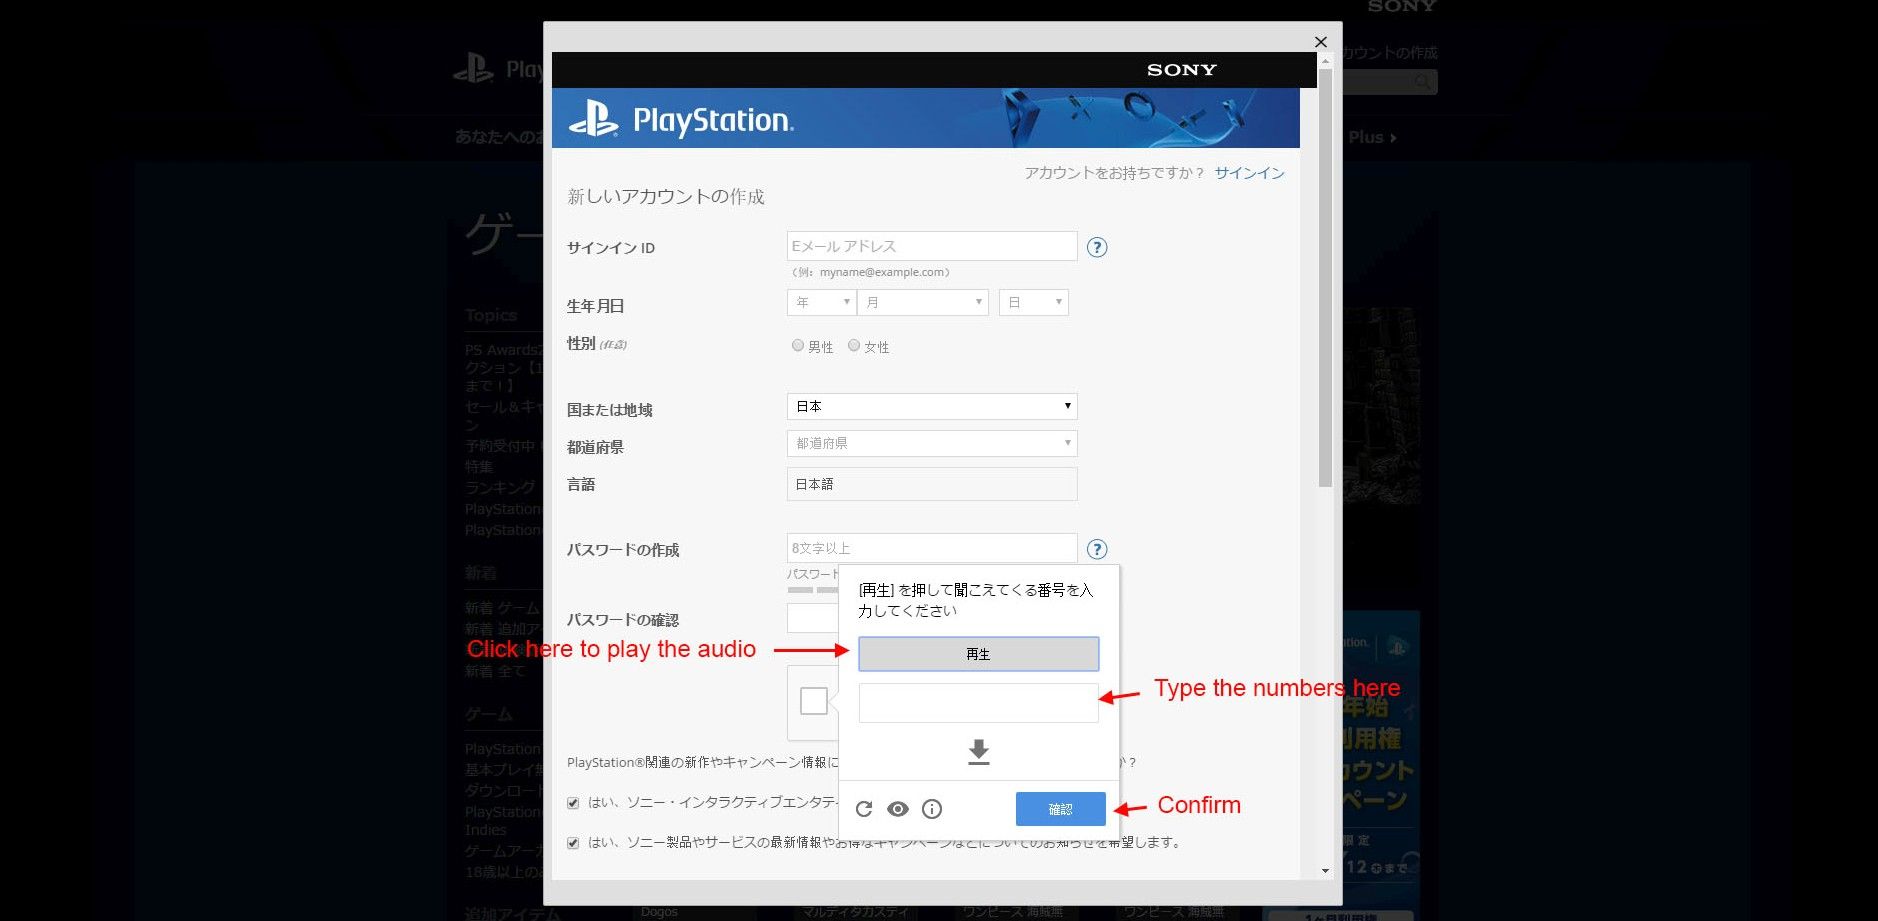
The next window is where things start to get a bit complex, especially since Chrome does not automatically translate the pop-up. Don't worry, we're here to help. Below you can see all the data you need to input.

You can use any e-mail address. It doesn't need to be a Japanese one. Gmail will work perfectly. Just make sure that you don't use one that is already bound to another PSN account, or of course, it won't accept it.
If it displays this message in orange, you are trying to use a mail that you already used for another region.

You can use any gender and birthdate, even your real ones. This is actually advisable, as they might be helpful to recover your password in the case you forget it. As a matter of fact, I would advise to note down all the data you submit during the process, as it might turn out to be useful in the future.
Leave the country as is. You're trying to make a Japanese PSN account, not one for Guatemala.
For the prefecture, select "東京都" (Tokyo), it's simply the most convenient. If you actually live in Japan, select the prefecture you live in. Even if you moved in just yesterday, I'm quite sure you can find out its name in Kanji.
The password needs to be eight characters long, and include at least one special character or number. Af course you need to type it twice. If it displays the following message, you forgot the special character or number.

Now comes a tricky part, the captcha. Normally, it will display an image asking you to select certain elements. It changes every time, so of course I can't translate them all from you, but there is a trick. Click on the little headphone icon.

Make sure that your speakers are on. Click on the grey "Play" button, and it will spell a few numbers. Type them in the space below, and then click on the blue confirm button.

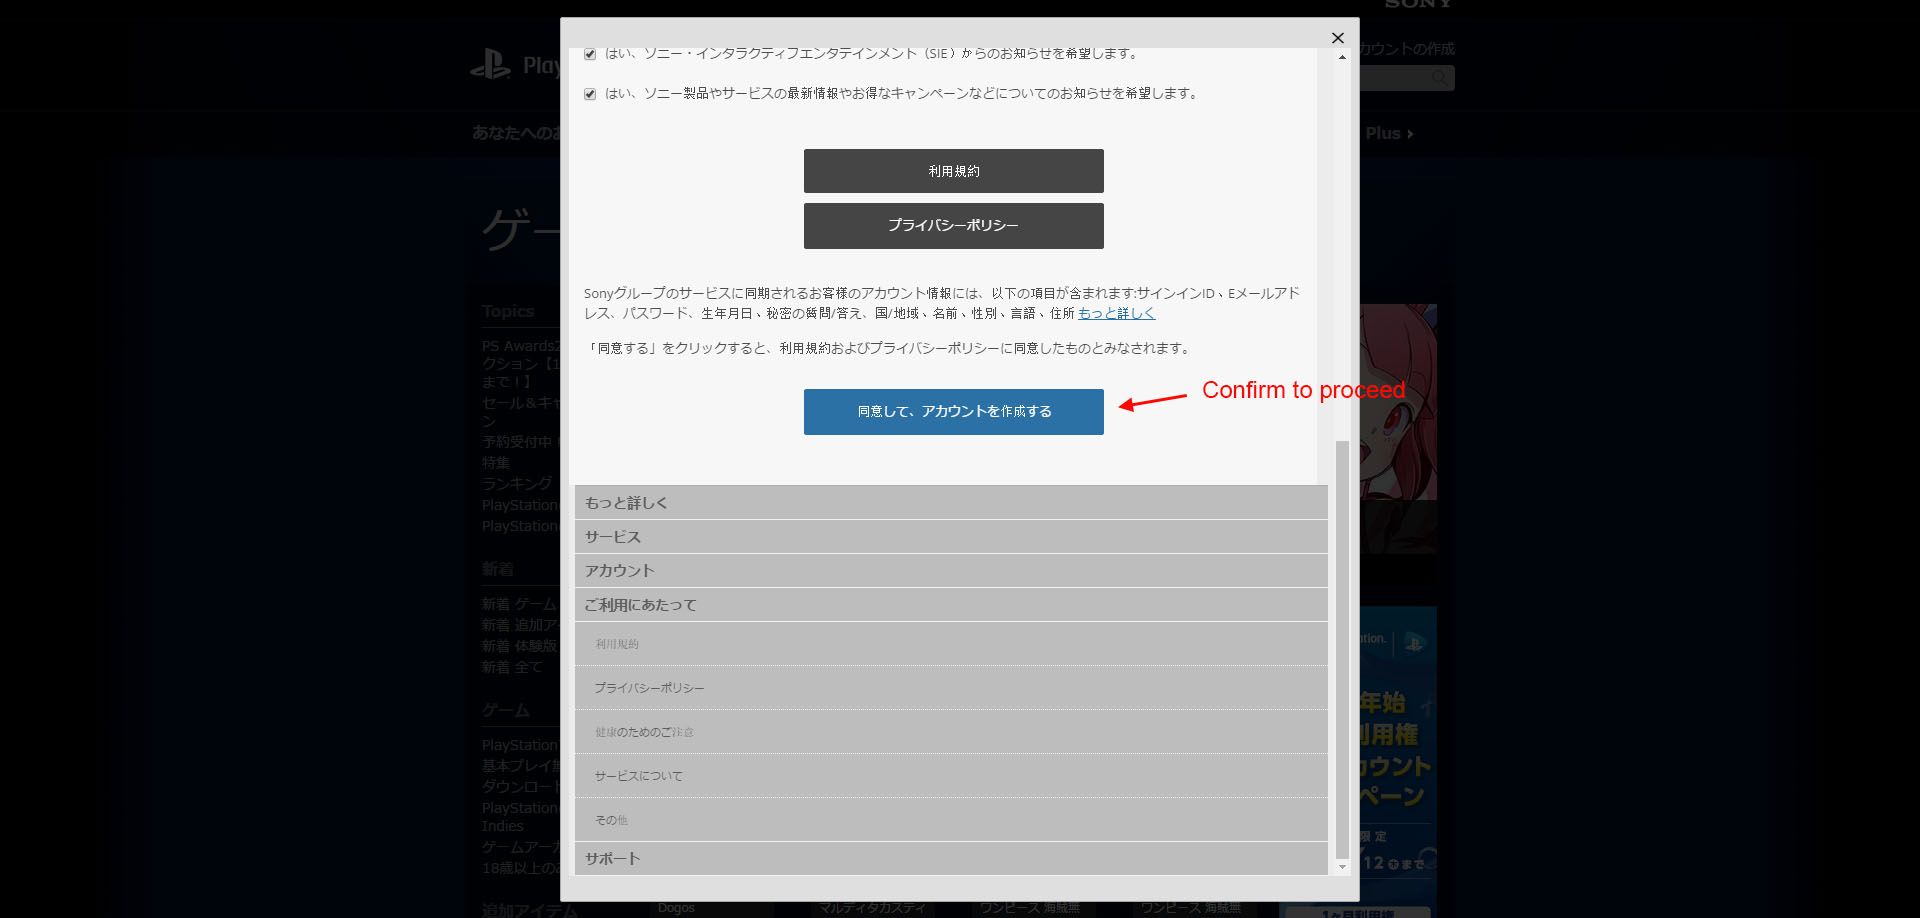
Now you're all ready to proceed. Scroll down and click on the big blue button.

If it displays this under the space to re-type the password, it means that it doesn't match. Type in the password twice again, making sure not to make any mistakes. You'll have to redo the captcha again as well.

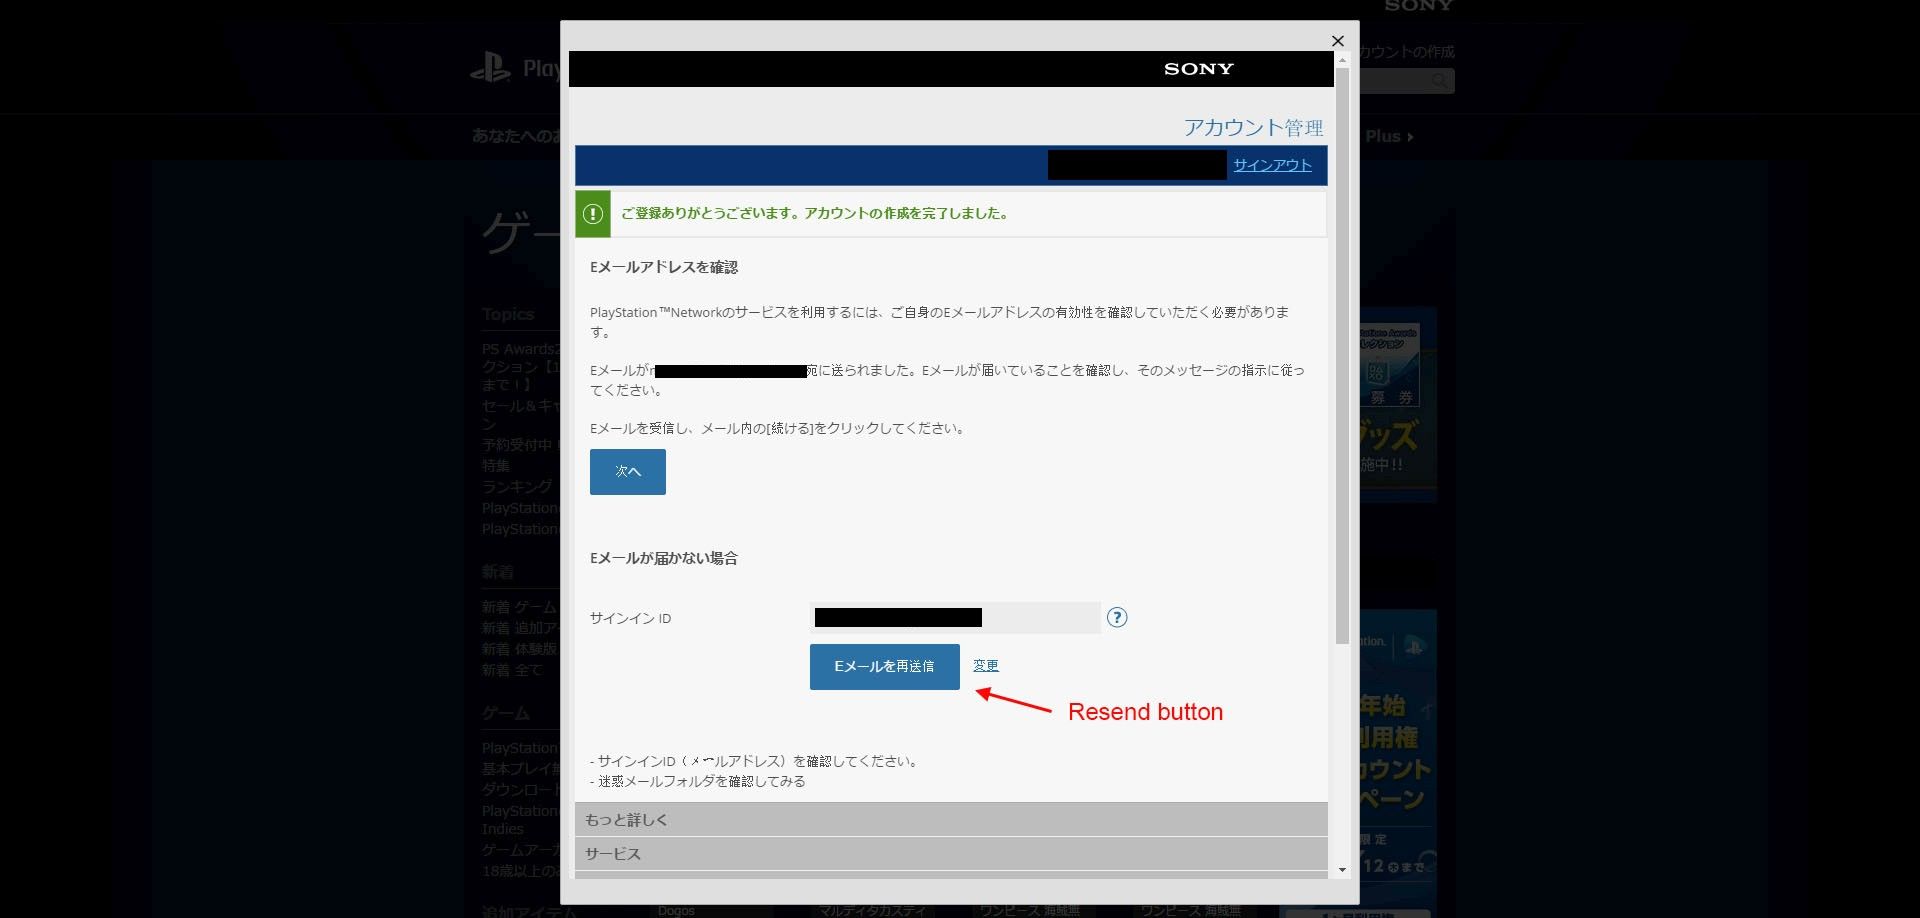
If you did everything right, you'll see the following screen, which is telling you to check your mail. If you don't receive the confirmation mail with the subject "[PSN] アカウント登録完了のお知らせ," you can click on the blue button to ask for another. Normally, it's instantaneous.

The mail you received looks like the picture below. Click on the blue button again.

If everything went well, this is what you should see. Congratulations! You're the proud owner of a Japanese PSN account.

Unfortunately, you aren't done. Go back to the store window and click on the log in button.

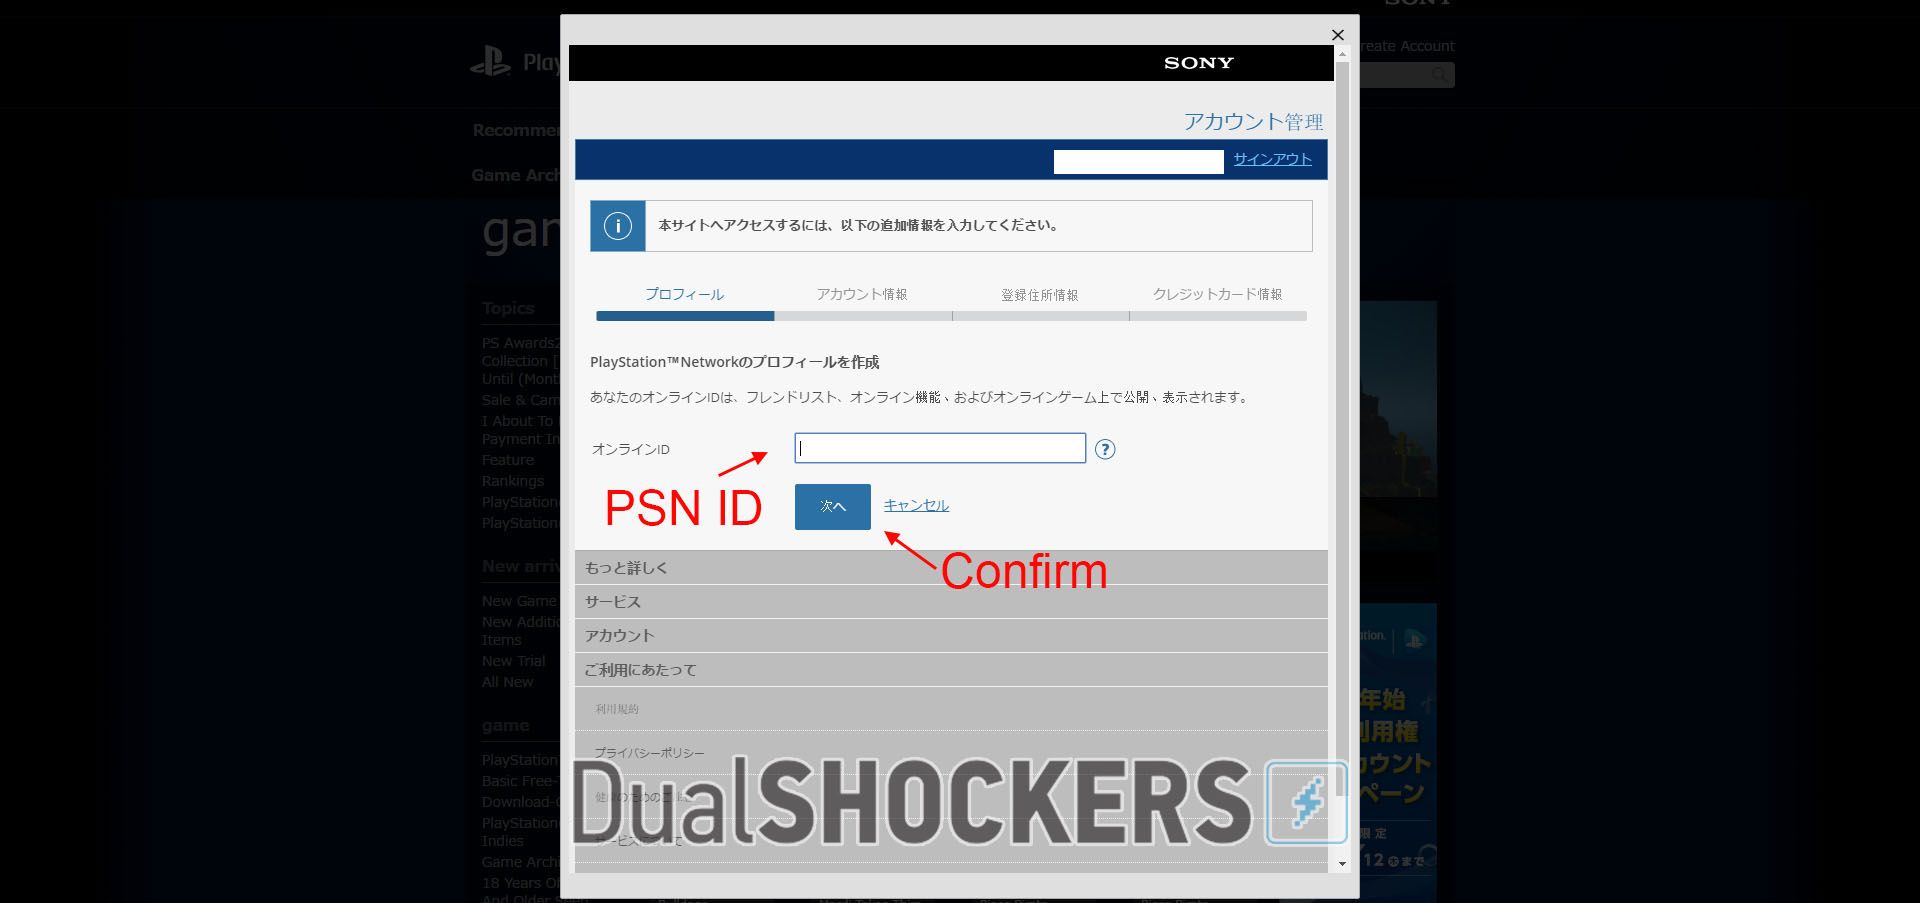
If you did not close the window, you should be already logged in, and see the window below. Insert the PSN ID of your choice (of course a different one from your usual PSN ID). Then confirm.

If for some reason you're not logged in, you'll see the window below instead. It's simply the login window. Keep it in mind, because it'll be the same every time you need to log into the store. Insert your email, your password, and confirm, then type in your PSN ID as described above.

If you see the following message in orange, tough luck. That PSN ID is taken, you're gonna have to retry.

As soon as you find a PSN ID that no one else already used, you'll finally be able to start inserting your data, as described in the image below. For the secret question, just choose the first "生まれた場所は?" It's asking where you were born. Any answer will work (just remember it, in case you need to recover your password). You don't need to type in Japanese, nor to hide your real name if you don't want to. Sony won't really run an identity check on you. It also won't be a problem if the name is the same as your existing PSN account.
If you want, you can even click on the blue link under the secret question to type in a custom one, to which you can give any answer you like.

Now comes the tricky part. The page you can see below asks you to insert your address. As opposed as the previous page, this one won't accept your real address (unless you live in Japan, in which case go ahead and type it in). The only data you really need is postal code, prefecture, municipality and the first address line. Prefecture should be already selected on the one you choose while creating the account. If it isn't, just pick "Tokyo" again (東京都).
The tricky part is that you need a real Japanese address, and if you don't live in Tokyo, of course you don't have one. The best way is to find the address of a local hotel. Check under the picture to find how.

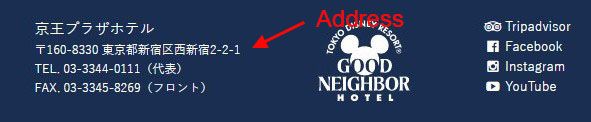
First of all you need to find a suitable hotel and its address in Japanese. Just google "Tokyo Hotel" and find out the actual official page of an hotel (not the generic Trip Advisor or Expedia Pages. Those normally don't have the addreess). Once you find it, change the language of the page to Japanese, as it will normally load the English one, then look for the following symbol "〒" followed by a number. That whole line is the address you're looking for. Below you can see an example.

Now I basically need to teach you how to read a Japanese address, because you'll need to disassemble it into the data you need. The number after the "〒" is your postal code. "東京都" is Tokyo. Copy it and paste it under municipality. Copy the rest of the address and paste it under "address line 1." If you're curious, the part before "区" is the ward, while the part after is the actual street address. You don't really need to know this, though.
The example above should look like the picture below. I'm not providing you with an address to copy and paste because it's better that you pick your own. If Sony starts getting thousands of users living in the same hotel in Tokyo, they might start getting antsy about it. Click the blue confirm button. If you see any orange text, something is wrong. Try making sure you divided the address correctly, or if worse comes to worst, pick another one.

If you did everything right, you'll get the following page, asking you if you want to enter a credit card. Select "No." The store accepts only Japanese credit cards anyway.

After you click no, your account will be ready for use, and you'll be redirected to the store and logged in. You'll notice that your PSN ID will appear on the top right exactly like in the western stores. If you aren't logged in, just click on the login link and log in as described above.
You can now use the account exactly like your usual one.
Now open your PS4 (we're using PS4 as an example. The process is fairly similar on PS3, but on PS Vita you're required to wipe your console before changing account. Luckily you can save a backup).
Go to Power -> Switch User -> New User - Create a User. Accept the terms and conditions, and select next, then insert your new Japanese PSN ID and password like you typed it in the process above, then click on sign-in.
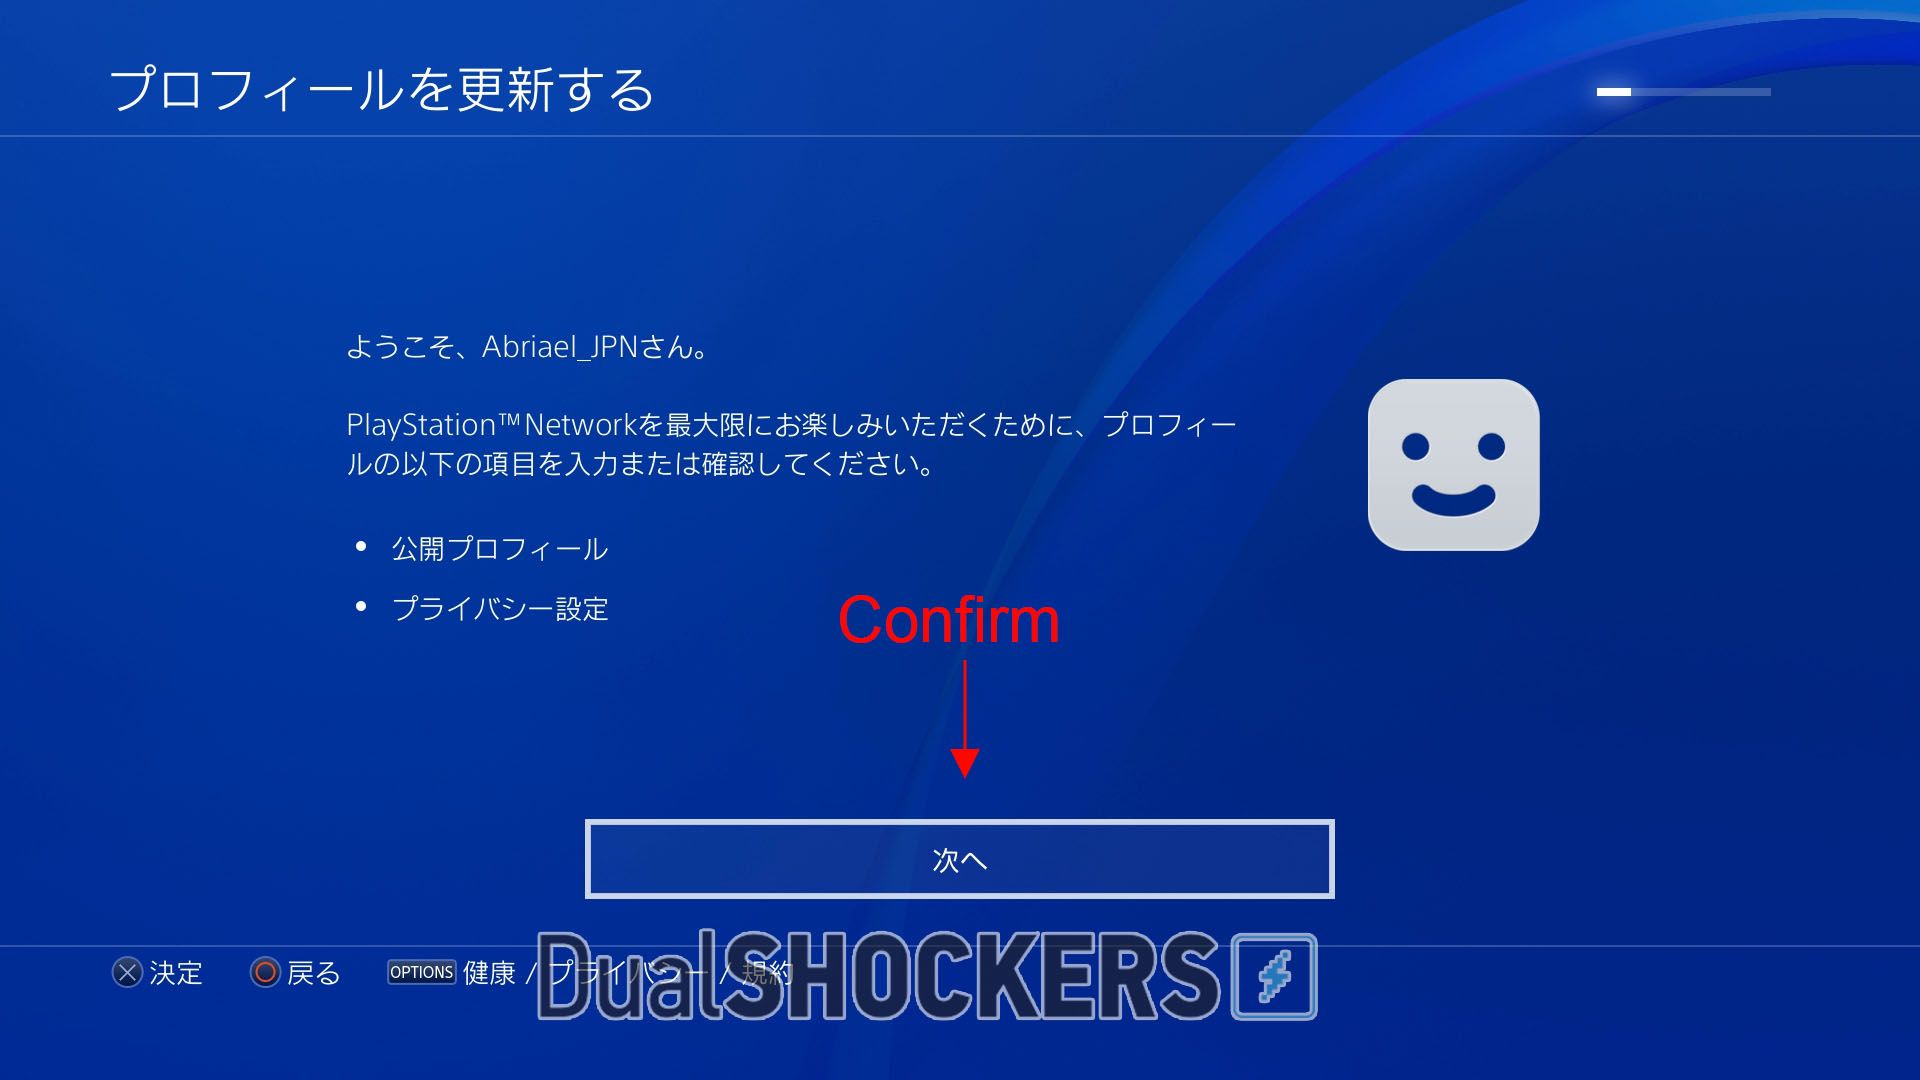
Oops, we're back to Japanese, but don't be intimidated. We'll be back to English (or your chosen language) soon. Simply confirm on the first window. Keep in mind that since your PS4 is a western one, in the dashboard you still use X to confirm and circle to cancel. Within Japanese games, it'll be usually the opposite, circle to confirm and X to cancel.

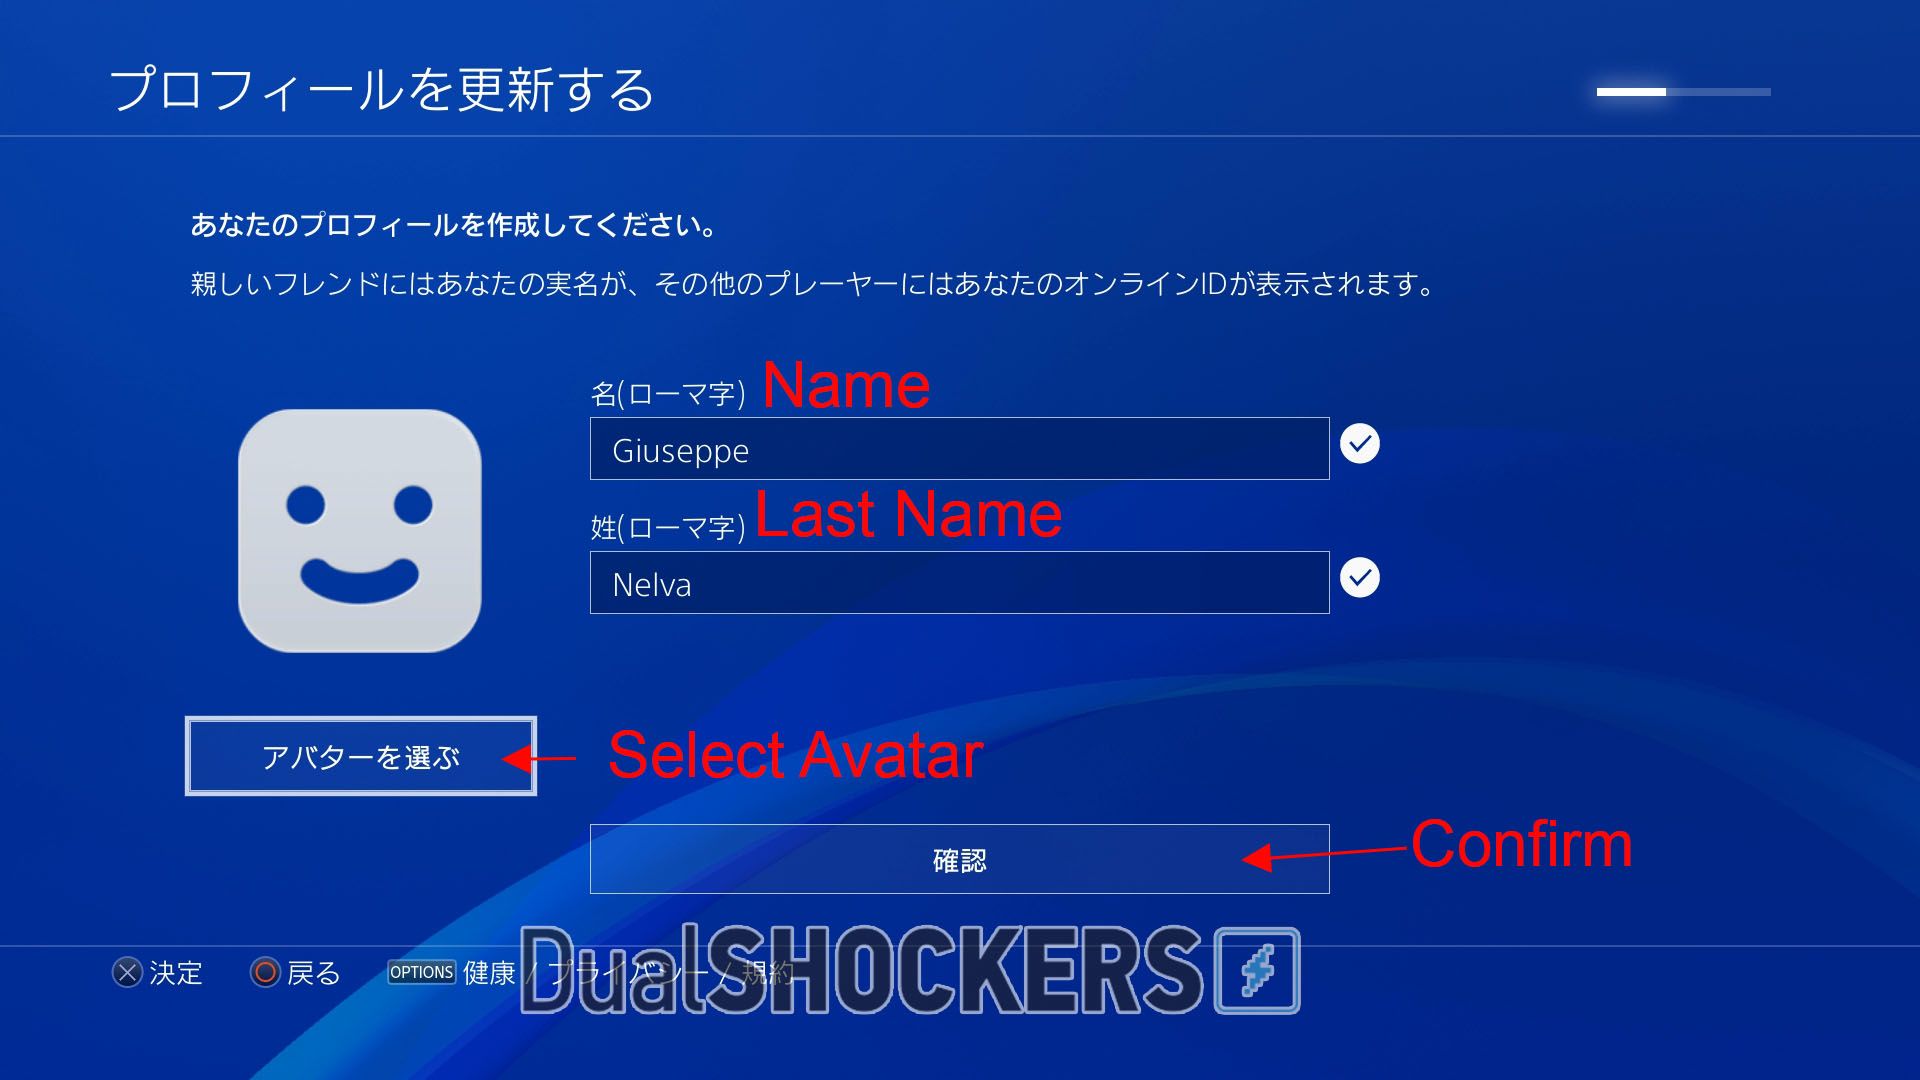
Your name should be already filled in. Select a PSN Avatar if you like, then confirm again.

Next are your privacy options, leave them as is for now. Do the same in the following two screens (they're very similar).

Confirm in the next screen.

Ignore linking to facebook by selecting the option on the left.

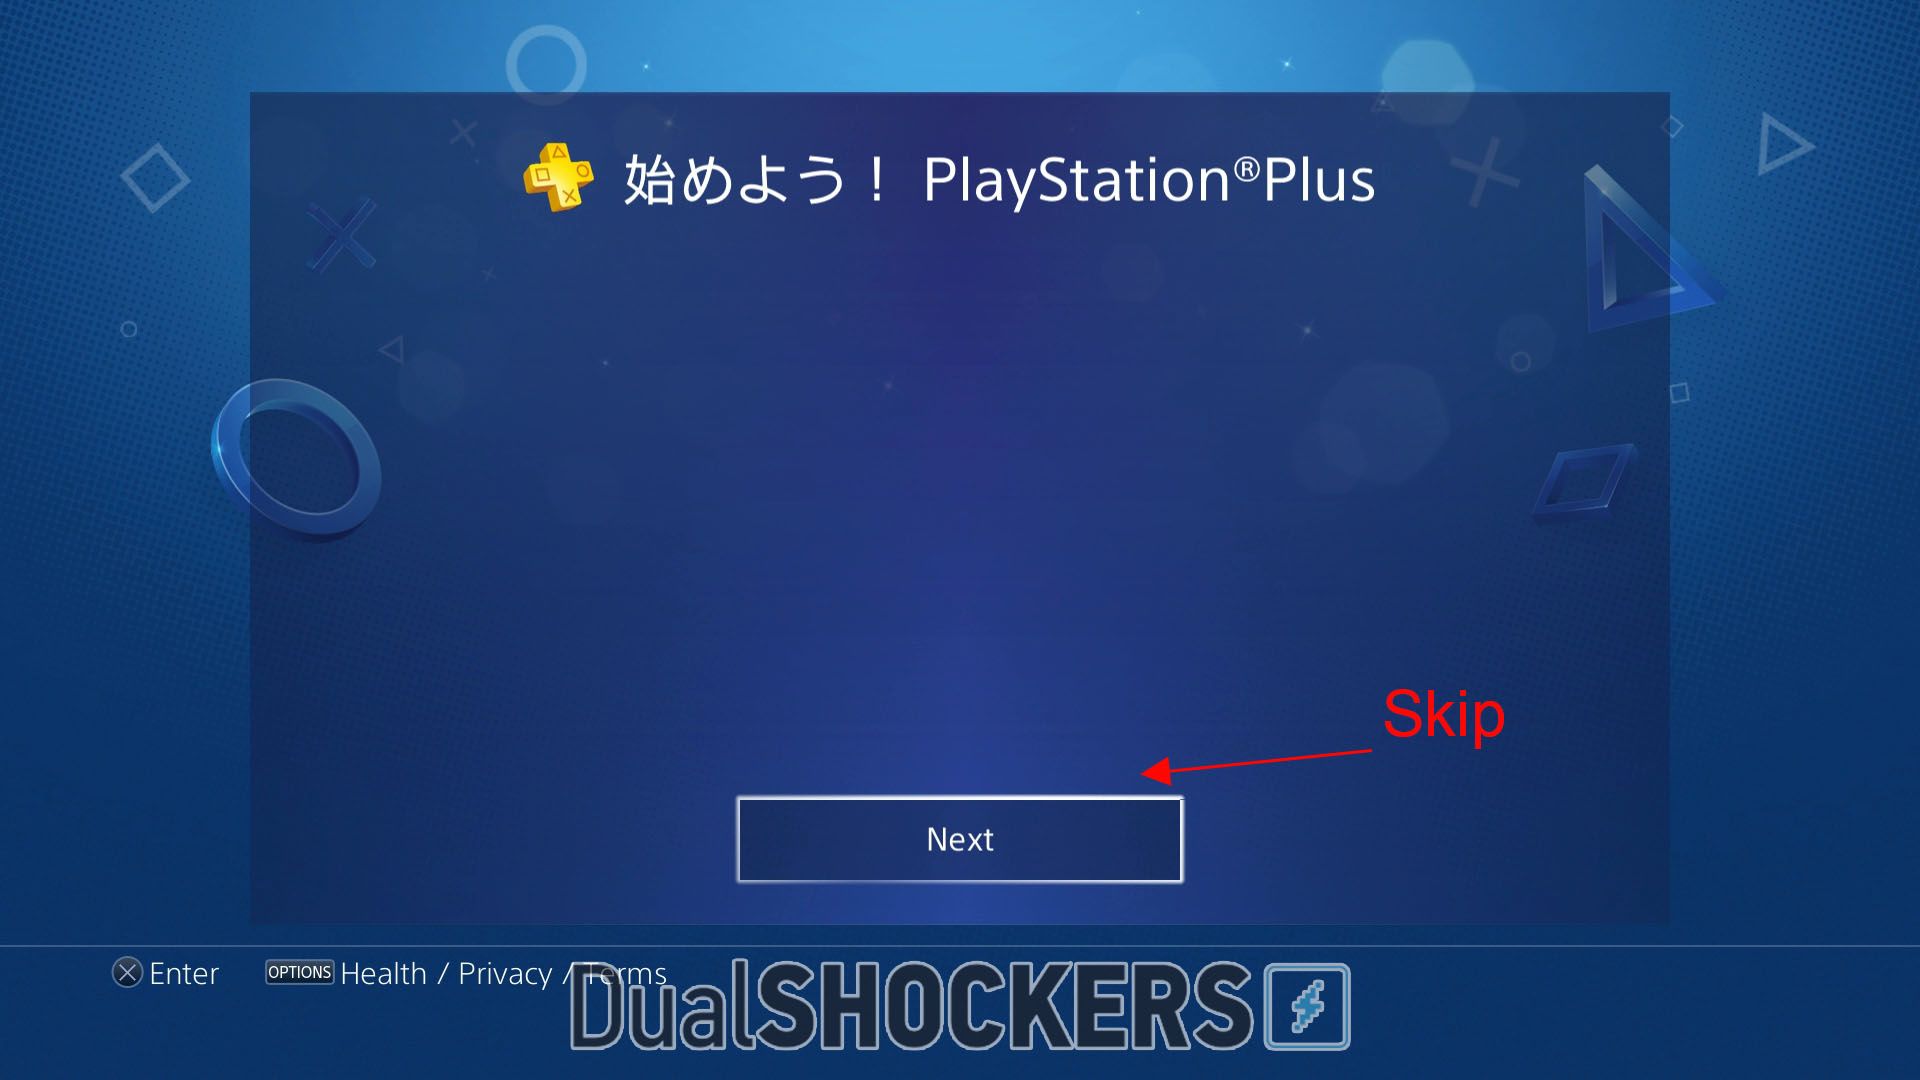
Skip the two PlayStation Plus screens.


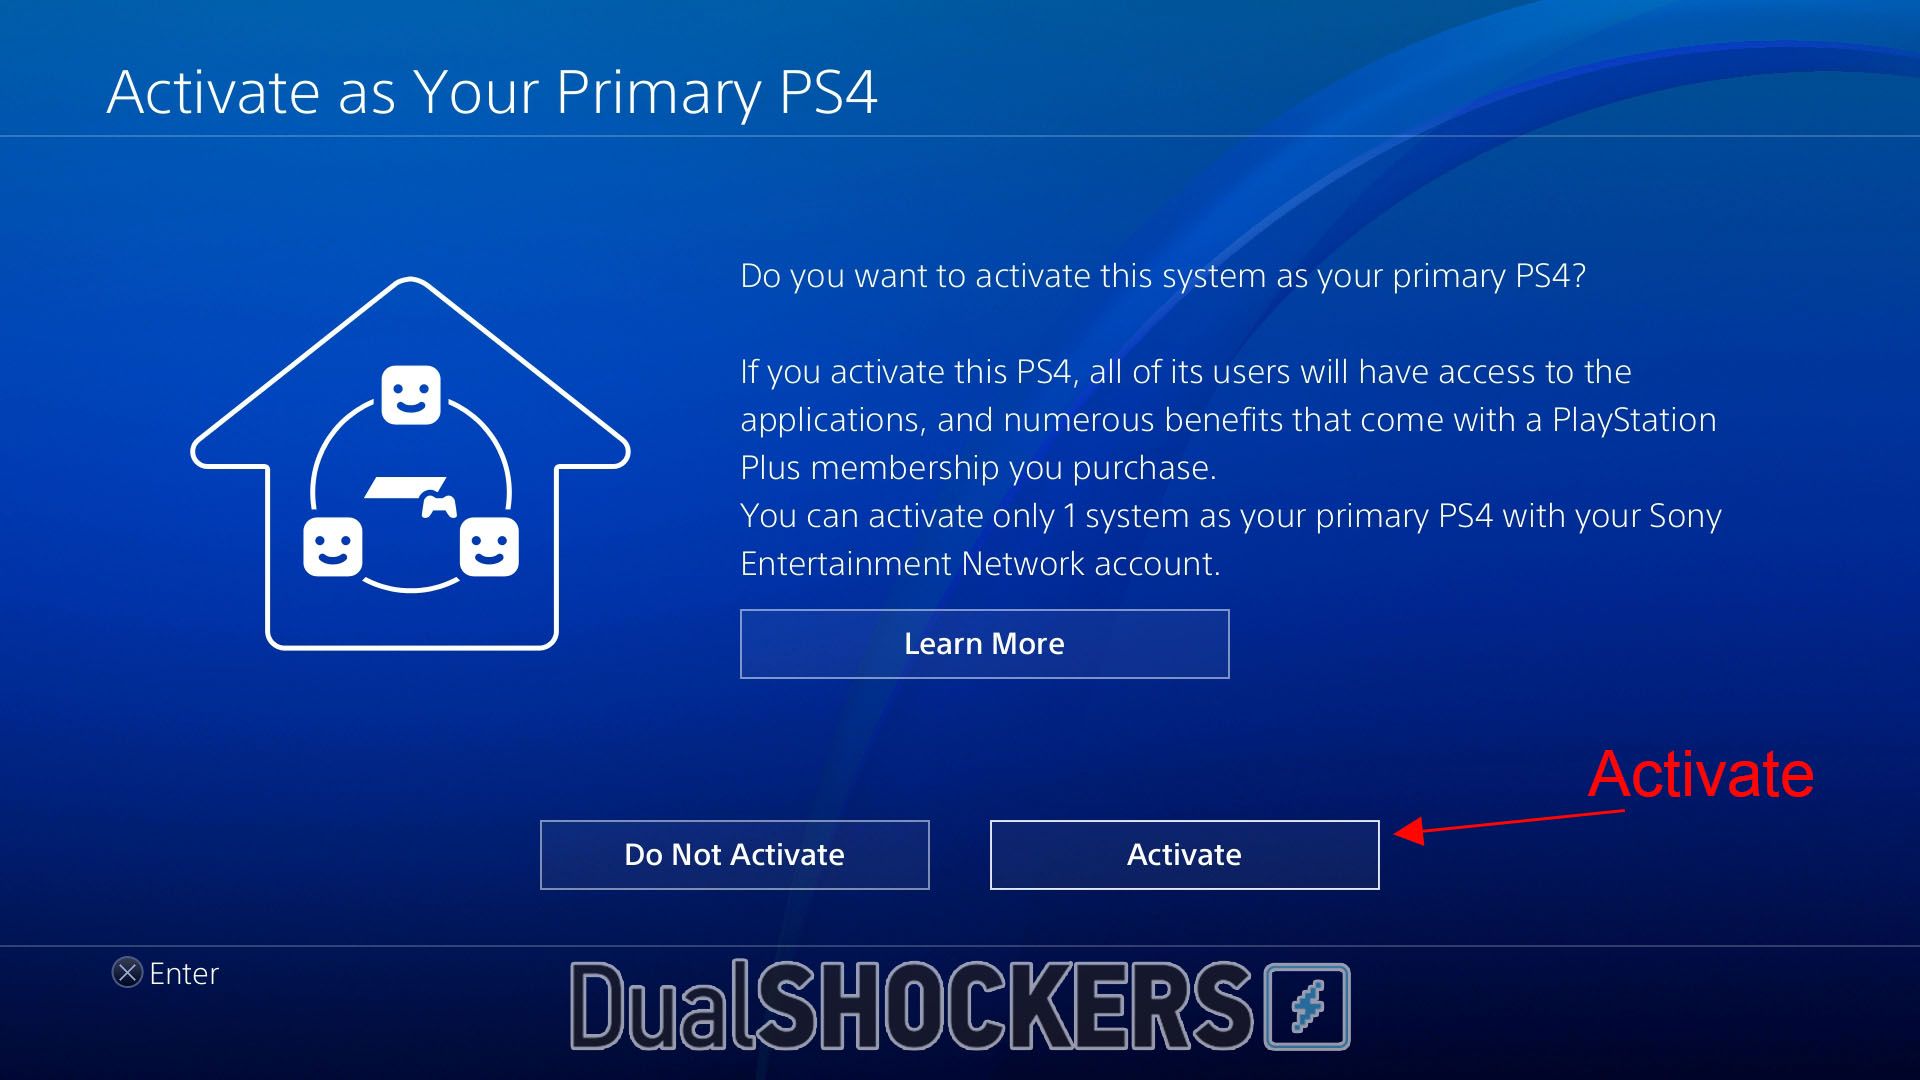
Activate the PS4 as your primary console. That way you'll be able to share your games among all the account that have the same console set as primary. This will allow you to play Japanese games you downloaded from the PSN on your main account, and get their trophies on it. The drawback is that you can't use any DLC, free or paid, on a non-Japanese account, so you're advised to play any Japanese game you want to get DLC for on your Japanese account.

Confirm twice more. Welcome to PlayStation 4! Your account is now fully functional and active.
Keep in mind that now the dashboard will be back to the language you selected with your primary account, so you can easily find your way around. There are only two exceptions, the PlayStation Store, and the Settings -> PlayStation Network/Account management menu.
To get around the PlayStation Store, just use the web store with google chrome, and you can easily navigate it with the automatic translation and start downloads from the web interface. The Account Management menu is a bit more tricky, but if you really need to find something there, just look at the one in your main account and retrace the same steps on the Japanese one. It should be a rare occurrence, though.
Now that you have your Japanese account ready and waiting, you can start by downloading all sorts of spiffy demos and free themes. Here is where to find them for PS4.

When you look for themes, select the option indicated below (the last of the menu) to order them from the cheapest, bringing up the free ones at the top of the list. Keep in mind that only the ones with the shopping cart icon and the following kanji "無料" (Free) are actually free. Those missing them are bonus themes that require a purchase in order to be redeemed.

But what if you actually want to buy some games?
First of all, unless you have a Japanese credit card, you'll need some Japanese PlayStation Store cards. There are a few stores that sell them, but not all of them are reliable. Personally, I use Play-Asia.com, mostly because they are reliable, and they'll put a digital code directly in your account, without needing to actually mail the card. Just make sure you select the ones with the Japanese flag, because PlayStation Store cards are not region free. If you select the wrong country, you're screwed.
Once you have your PlayStation Store card code, go to the web store, and log in like I explained above, if you're not already logged in, then select the following option.
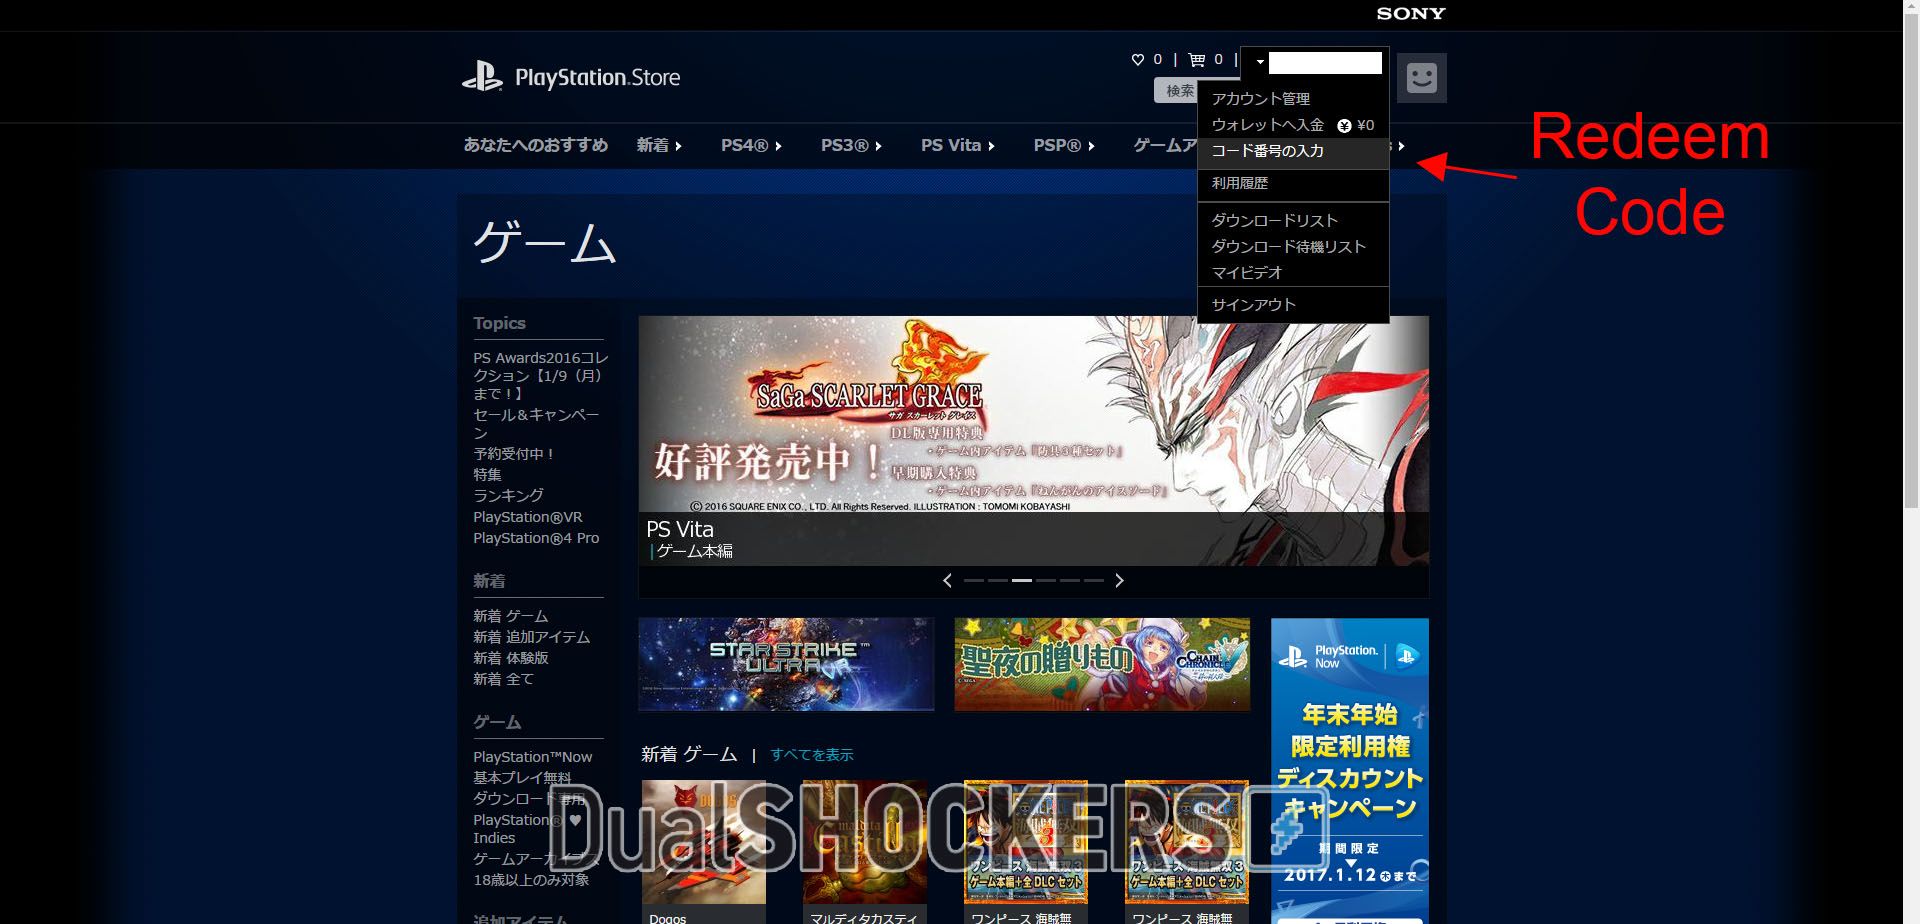

Insert the code in the field indicated below, and confirm.

Confirm again with the blue button. Then reload the store, and your wallet will be updated, ready to purchase your game.
Since we're at it. Let's see what you should do if you forget your password. Open the login menu and click on the "troubleshooting" link.

Now click on the "Reset Password" link.

Type in your email, do the captcha with the audio option as I taught you above, then confirm.
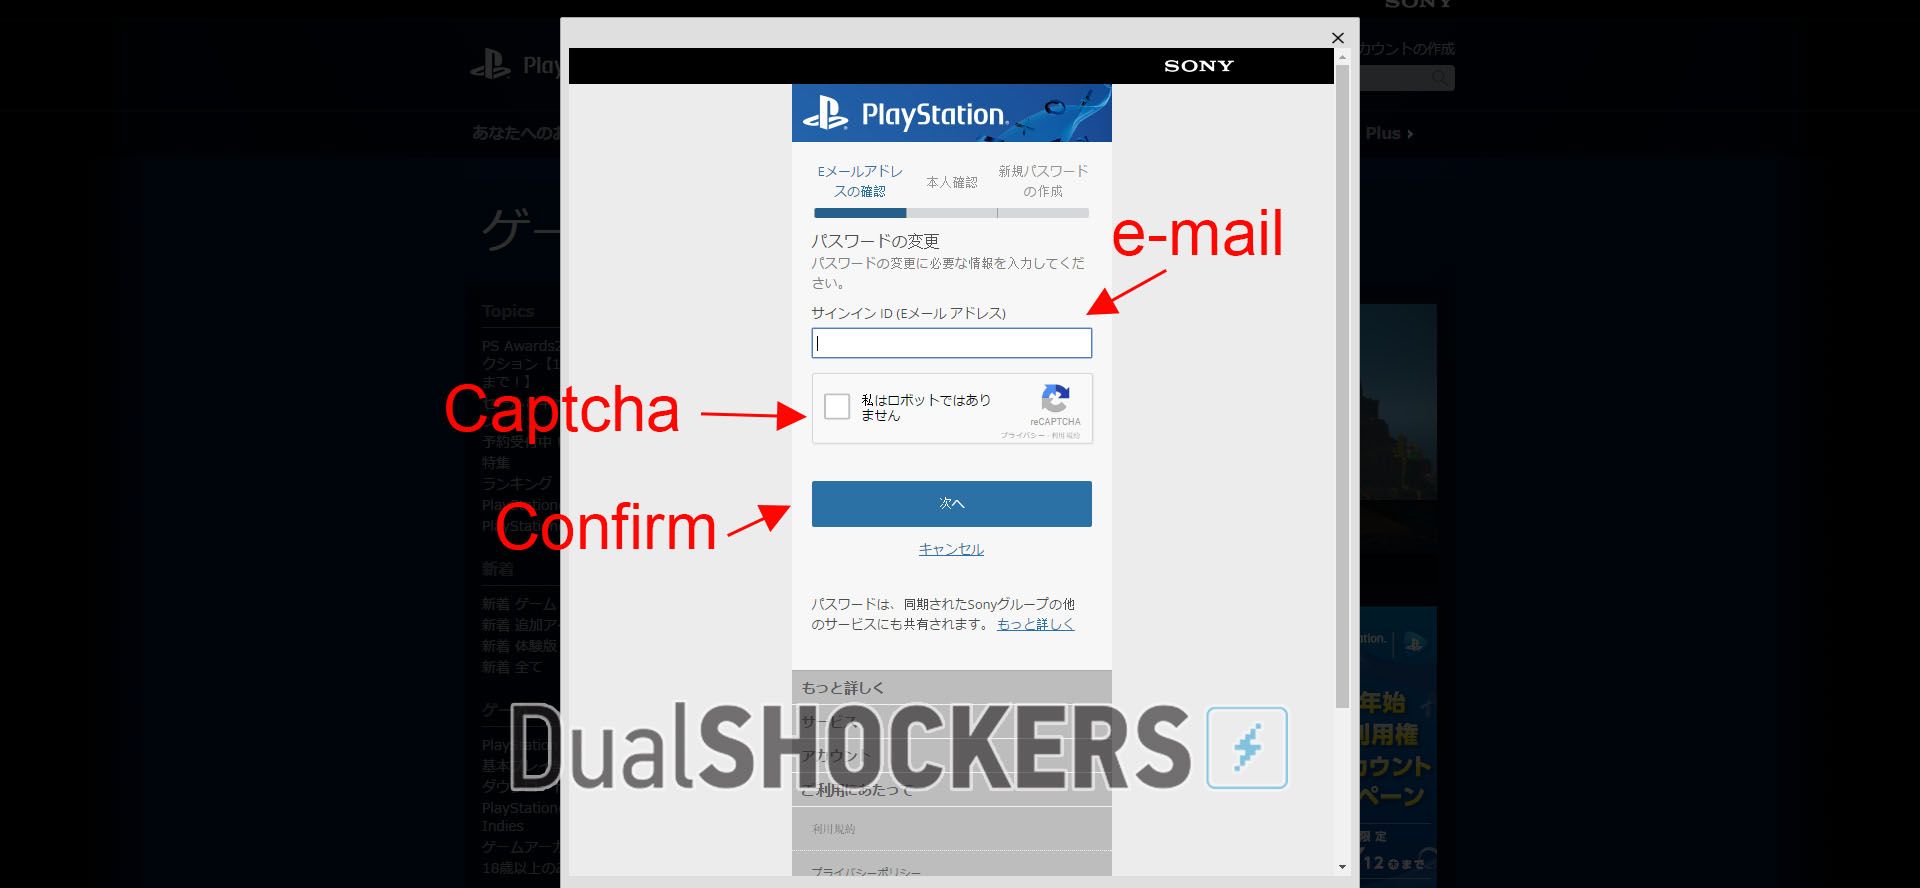

Go to your mailbox, and you'll find a mail with this subject line: "パスワードの変更手続き." Click the big blue link.

You'll be asked to verify your identity either by inserting your date of birth or by answering the secret question you set before, then confirm.

Insert your password and type it a second time (remember, you need at least one number or special character and over eight characters in total), then confirm.
If you see the sentence below, you changed your password successfully.

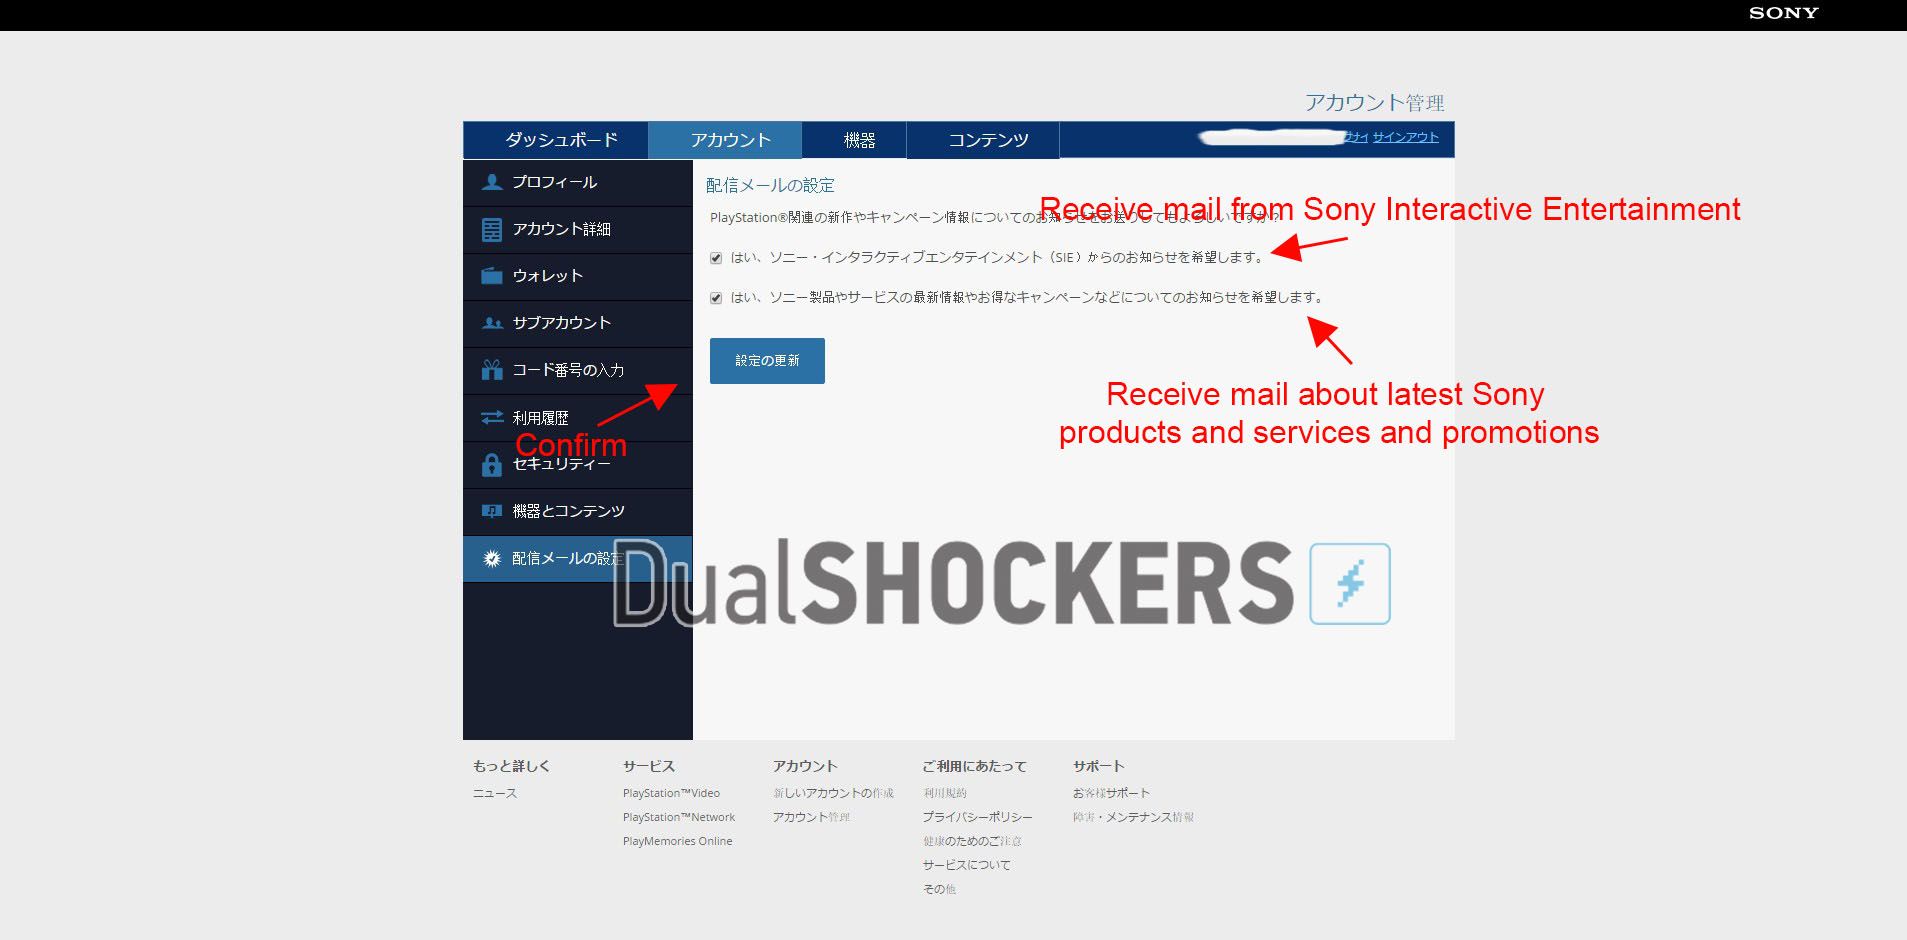
Before you go enjoy your new Japanese account, here is another useful tip. If you want to take part in Japanese beta tests, you need to set your account so that Sony is permitted to send you marketing mail. Here is how to do it.
Select account settings from the web store.

Select mailing settings.

The following two options are quite different. At times they will be both on by default. The first is the one you need on for betas, allowing Sony Interactive Entertainment to send you marketing mail and notifications.
The second allows the whole Sony group to send you promotions and advertisement, so unless you're interested in receiving a lot of spam in Japanese, uncheck it.

And with this, you're all set. We hope you'll enjoy your newly created Japanese PSN account!