Some Elden Ring dungeons are fairly straightforward, but Auriza Side Tomb is one of the more complex in the game. The dungeon is full of transportation trap chests, and it uses several ‘mirror’ rooms that look identical in order to further confuse you as you try to navigate the imp-infested tomb.
This guide will take you through each room in the dungeon. It’s not the most straightforward path, but it ensures you will obtain every item available.
How To Find Auriza Side Tomb

Auriza Side Tomb is located just north of Auriza Hero's Grave in the northeastern Capital Outskirts just outside Leyndell, Royal Capital. If you've already accessed the Capital Ramparts site of grace, you'll want to head back outside the city and take the path beneath the Capital Ramparts bridge entrance. The area leading up to Auriza Side Tomb is inhabited by a large bear and a Lesser Runebear, so be careful in your approach to the tomb.
Navigating The Dungeon

- Follow the tomb path past the sealed boss door and into the room full of wandering small Living Jars. Be careful: some of the Living Jars will explode upon death. You’ll encounter multiple of these exploding Living Jars throughout the dungeon, so be on your toes. Inside this small room, you will find a Grave Glovewort [6].
- From this room, you will find a window out the left side of the room, and a path leading down to a transporter trap chest straight ahead. Taking the window offers a slightly more direct path to the end of the dungeon, but ignore that for now.

- After taking the transporter trap chest, you’ll find yourself in a room with three imps and a Grave Glovewort [5] and [6]. You’ll spy the boss room lever across the way, but you won’t be able to access it just yet.
- Proceed down a thin staircase to a watery room below. You’ll spy a gated area ahead—you'll get in there later—but for now, continue down the path leading to the right.
- Beware of an imp above you who will begin hurling lightning pots at you.

The next room will look more like a chapel with a chest at the far end. An imp will attack from your immediate left. Another imp lurks at the far end of the room, and one is high up on the right ledge, hurling pots down at you.

Taking the Chapel’s transporter trap chest will land you in an enclosed area with two large Warrior Jars. Defeat them and loot the room: you will find 2 Cracked Pots and the Perfumer’s Cookbook [3]. This room is a dead-end, so take the transporter trap chest back to the Chapel.

The southern wall in the chapel room is illusory. Head down the newly revealed stairs to a small room. Two small exploding Living Jars will immediately charge you. After defeating them, you will find 1 Grave Glovewort [5] in the room along with another transporter trap chest. Take this transporter trap chest, and you will teleport to a balcony ledge overlooking the second chapel room.
To reiterate: this is not the same chapel room you were in previously. It's a nearly identical one, and can quickly get you turned around if you can't keep it straight.
Defeat the two imps on the balcony and loot the Golden Rune [7].

- On the northern end of the balcony, take the thin staircase up. You will be in a familiar-looking room, but don’t be deceived; it’s different. You know by the lack of the boss door lever noted earlier.
- Defeat the two balcony imps in this room, then drop down and defeat the third imp beneath the stairs.
- Loot the Grave Glovewort [6] beneath the stairs as well, then head up the stairs.
- The next room will have a Large Jar Warrior waiting inside. Beware of a small exploding Living Jar hiding around the right corner. Loot 2 Root Resin and 1 Ritual Pot in the room.
- Head back into the previous room and down the thin stairwell, through the watery room, and back into the second chapel room.
- The side room contains another transporter trap chest that will take you back to the first chapel’s balcony. Ignore this transporter trap chest since it actually leads you back to the very first transporter trap of the dungeon, and you still need to pull that boss door lever!
Reaching Boss Door Lever

The second chapel’s main transporter trap chest will take you into a watery room with two small exploding Living Jars, 1 Ghost Glovewort [6], and 2 Cracked Pots. You’ll find a ladder in the back right corner of the room as well. Climb the long ladder to reach a familiar ledge with 1 Grave Glovewort [6] and, finally, the boss door lever.
Drop down and head up the stairs ahead to another transporter trap chest. This will lead you back to the very first transporter trap chest. Take the path straight ahead to find the site of grace up the stairs on your left and the boss room down the stairs on your right (now open). Rest up before the boss fight.
Defeat Grave Warden Duelist

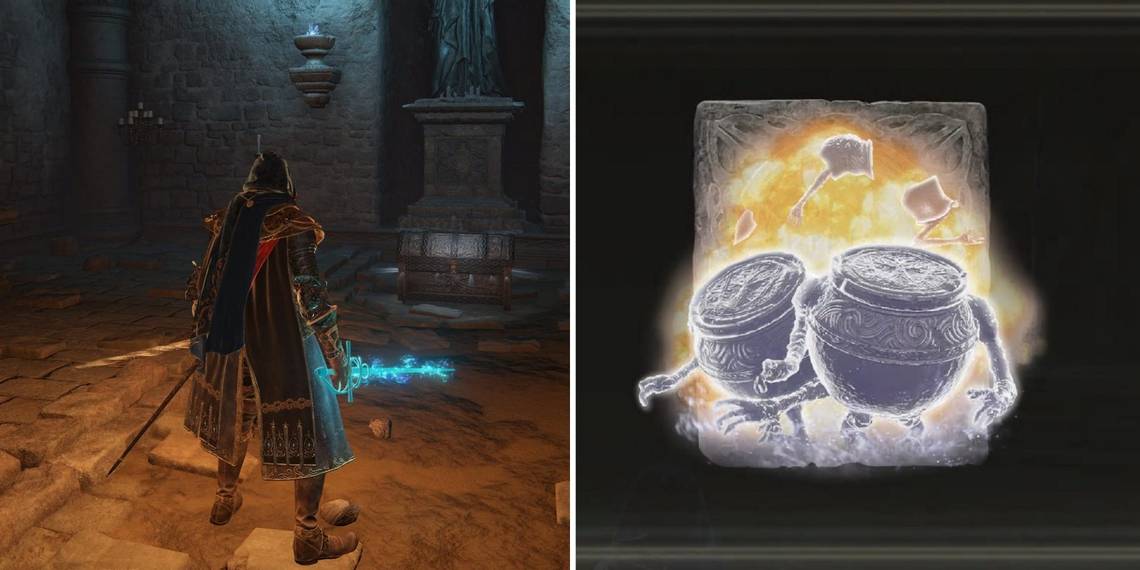
The Grave Warden Duelist might be a familiar boss by this point in the game, as he is one of the repeated enemies you’ll encounter in the Lands Between, but his unorthodox weaponry can make him a tricky fight. In addition, he is accompanied by four small Living Jars. Don’t worry, though; none of them will explode on you.

After defeating Grave Warden Duelist, you will be rewarded with the unique and charming Soldjars of Fortune Ashes, a strange and powerful Spirit Ash to add to your collection.