Red Dead Redemption 2 has been out now for a good few days now, which has given people enough time to enjoy the story, the side quests, and random encounters. For some — such as myself — the beauty of Red Dead Redemption 2 shouldn’t be forgotten: the developers and artists at Rockstar Games have made it an utterly stunning title to look at. Weirdly though, there appears to be no dedicated photo mode, outside of the camera you get at a certain point in the game.
Sure, the camera allows you to take lovely landscape photos, even a selfie, but it feels incredibly limiting. Considering games such as God of War and Marvel’s Spider-Man have been incredibly popular with their photo mode options, it’s surprising that Red Dead Redemption 2 doesn’t have one.
However, being someone who loves photo modes, I’ve managed to find ways to make the available tools in Red Dead Redemption 2 work in your favor to take incredible photos. Bear in mind, though, that these solutions to take amazing in-game pictures will result in some faffing around with the game's tools to get the shot right.

Change Your Eye-Level When Using the Handheld Camera
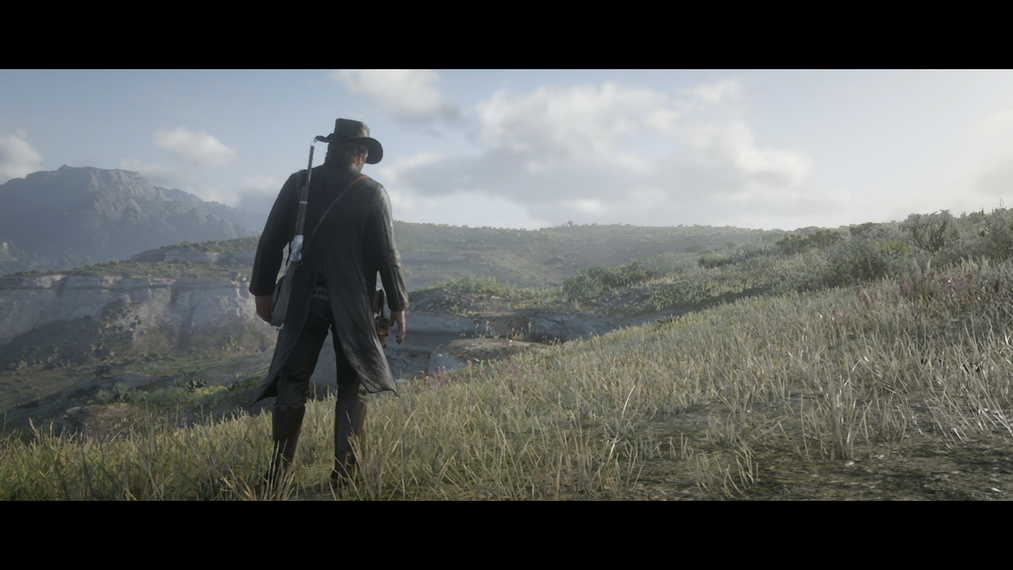
This mode is great for snapping photos of the landscapes or other characters, but it really sucks not being able to change the vertical position of the camera. While some landscape shots look good enough on their own, you might want to get a bit experimental to get that beauty shot.
One way to do this is is to assess your surroundings for dips or bumps in the ground: after all, Arthur holds the camera eye-level. The trick here is to get that eye-level lower or higher, which can cause for some really nice-looking shots. You can also use subjects in this way to add dramatic or powerful shots, such as getting lower than your horse and snapping a photo of it as the sun rises through the fog.

Portrait Mode and Heights
This is the most limited mode for taking photos, but it can give you interesting compositions if you plan your shots and pay attention to your surroundings. When you take photos in portrait mode (aka "selfie mode"), the camera is placed onto a tripod and set in place, only allowing you to pivot, tilt, and zoom. However, if you pay attention to the distance that Arthur stands when posing, you can start using that information to frame some awesome photos.
If you activate the portrait mode when facing a rock, chances are the tripod will be situated on the rock, thus resulting in a high-angle shot. The same goes for activating the portrait mode when facing a small dip: the camera will be lower than the default set height, allowing you to capture empowering images. Have a look at the two images below: I'm facing the raised portion of a roof, and the prompt's allowing me to place my camera. Once placed, the camera gives a nice high-angle shot:
Of course, the limited choices do mean that you can’t really do that much after you’ve exhausted most poses and animations, especially with the short zoom distance. It’s also worth keeping an eye on lightning nearby, as this can drastically help set the mood for some shots.

Cinematic Mode and Capture Screenshot
Yep, the mode you can activate when out in the world can serve as a "photo mode." Although this is also rather limiting, it does yield some incredible results. Activate Red Dead Redemption 2's Cinematic Mode by holding the Back button on Xbox One (or the touchpad on PS4), then push in the right thumbstick to change shots. When you’ve got a shot you like, you can slightly manipulate the placement of the camera by moving the right thumbstick about. Once your shot is ready, hit your console's capture screenshot button and hope it looks good!
The downside to the Cinematic camera mode is that you do get a bit of a time limit with the chosen shot before it automatically changes to another shot, so really it’s about being quick. You’ll also be capturing those black bars too that create a more cinematic wide-screen image, but you can easily crop those out if you so wish in a photo editing program.

First-Person Mode and No HUD
This isn’t all that different from looking through the camera mode, but I suppose it does let you at least crouch down to get a lower-angle shot. It’s also a bit more fiddly to actually frame your shot, mainly because you’re controlling a whole man rather than a small camera: it's worth experimenting with, though. On another note, it lets you get more up-close and personal with some of the objects in the world than in some of the other options mentioned above. When you change the first-person field-of-view to "low" from the camera settings, you can get some really good-looking shots.
A final point to make is that while the game world itself looks pretty, you can't just rely on beauty to take the photo. Ensure your lighting looks great: sometimes shooting into the light is best, other times it's best to have the light behind the camera, as sometimes objects emitting light can create the shadows you want. Composition is also a huge must when framing your shot: have your characters looking into the empty space for example, or have the horizon set to the middle of the frame, going horizontally.
Also, make sure you're locking that focus, otherwise you're going to end up with a lot of out-of-focus shots. Further adjustments can be made in photo editing programs to change the saturation, brightness, shadows, and even crop. Have a look at some of my edits from the photos I snapped while playing Red Dead Redemption 2:
So there you have it: four photo mode tips for Red Dead Redemption 2. It’s a shame there isn’t a dedicated photo mode built-in for such a beautiful game, and it feels like Rockstar missed an opportunity here. But what we do have are very limited modes that can be manipulated in ways to achieve some good-looking shots.
If you’re still interested in grabbing Red Dead Redemption 2, you might want to give our review a read and then you can head over to Amazon and get hold of it there if you like. If you enjoyed these tips on how to take photos in-game, then you'll also want to read our ten tips to help make you a better outlaw as well. If you do head out and put these tips to the test, be sure to share your photos with us on Twitter, or down in the comments below.